Kubuntu provides a package that allows you to take advantage of the capability of your NVidia Graphics Card.
Installing the NVidia Graphics Driver
1. Open Adept by going to K->System->Package Manager (Adept)
2. Type nvidia on the Quick Filter text box.
3. Choose nvidia-glx from the list.
4. Click the install package button.
5. Click commit changes button. You can find it on the menubar of Adept.
After installation you still have to enable the graphics driver.
Enabling the Nvidia GLX driver
1. Go to the Linux console by clicking K->System->Terminal Program (Konsole)
2. Type:
$ sudo nvidia-glx-config enable
3. Provide the administrator password
You will know that your installation is successful if you see the NVidia splash screen everytime X windows starts.

Saturday, November 26, 2005
Linux Gaming Part 4 - Installing NVidia Graphics Driver
Friday, November 25, 2005
Linux Gaming Part 3 - Installing Cedega
The installation procedure of Cedega is very similar to WINE.
You can always compile from source but the quickest way to install Cedega is to get the latest stable package at http://transgaming.com.
You first need to subscribe in order to have access to this package.
One you have downloaded the package you simply:
1. Open the Linux Console
2. Type:
$ sudo dpkg -i cedega_5.0.1_i386.deb
3. Type:
$ cedega
This will display the license agreement screen.
4. Simply click the accept button
5. Enter your subscription user and password
6. Just follow the rest of the setup wizard's instructions
Cedega would download Microsoft Fonts, MozControl Package, then finally the Cedega Engine.
To confirm that Cedega has really been installed click K->Games->Transgaming Cedega.
It's there.
Tuesday, November 22, 2005
Linux Gaming Part 2
WINE Versus Cedega
WINE and Cedega can both be used to run Windows compiled games in Linux.
WINE though covers a wider scope. It is intended to run not just games but every Windows application.
The philosophy behind this, of course, is that if people can run every Windows application in Linux then they would have an easier time shifting to Linux.
Cedega on the otherhand is solely intended to run Windows games.
WINE pros
1. free
2. can run older Windows games
WINE cons
1. It's wider focus leads to slow development with regards to gaming.
Cedega Pros
1. Can run several of the latest Windows Games
2. Faster gaming development
Cedega Cons
1. Requires $5 subscription per month ( $15 initial subscription)
In the long run Cedega becomes costly. A one year subscription would amount to $60. And you are just paying for the ability to run a Windows game. You haven't even bought a game yet.
Saturday, November 19, 2005
Linux Gaming Part 1
I promised that on my next post I would discuss about accessing shared folders from Windows to Linux. Unfortunately, I would have to satisfy that promise on some future post.
In the meantime, Let me begin a series on another important topic that concerns Linux. That is the efforts to make Linux a serious gaming platform.
There are two kinds of movement to make Linux a serious gaming platform.
The first push is to develop games that are native to Linux. an example of this is Planeshift3D although it also runs on Windows and Mac OSx.
The other effort is to make Windows native games run on Linux through software translation. Examples of these efforts are Wine and Cedega.
Lets discuss about the first kind of effort. Linux gamers would always be left out by Game Publishers. There would always be a huge discrepancy between games published for Windows and those that are also published for Linux.
Linux thrives as a server OS but at the moment there are simply too few customers using Linux as desktop that the game publishers are not investing effort to make their titles available for Linux.
These may change in the future when more people have Linux for their desktop.
Perhaps the current trend of moving productivity softwares to web based will also help change this fact.
When most applications become web based it would not matter anymore to people whether they are using Linux or Windows for their everyday tasks.
This would help accelerate their shift to Linux since Linux is freely downloadable and comes with no license cost.
When this day comes game publishers would have to anticipate where their users would be coming from. And they would have to support all platforms.
But it remains to be seen.
Perhaps three years more before we see this happening.
Wednesday, November 16, 2005
Some Comments on Samba
Update July 2009: Kubuntu 8.10 and Samba
First Note. Samba is intended to be installed on one machine that will act as a file server. A file server of course is a computer whose sole purpose is to keep files that people want or need to share.
Kubuntu comes with a built-in Samba client that enables it to read and write to shared folders.
But on many cases today where Linux is being pushed as a Desktop OS (Operating System) this scenario would not work. Because people would want to share files on their own computer without going to a dedicated file server.
In this case, you have to install the whole Samba package (client and server) on the machine.
Second Note, only the administrator can set the folder sharing feature. If you're the only one using the workstation and you have administrator privilege, this would not be a problem. But if another user is using the workstation and they don't have administrator privilege, this would be difficult and time consuming for the administrator. Because they would have to call the administrator everytime they want to make changes to their folder settings.
A good way to tackle this would be for the administrator to predesignate a folder where users could drop files they want to share.
So far we have just tackled sharing files from Linux to Windows and Linux to Linux.
On the next post we will talk about sharing files from Windows to Linux.
Monday, November 14, 2005
How To: Share Files Using Samba
Please refer to this update: Kubuntu 8.10 and Samba for the newer and improved way of handling this.
In order for Kubuntu to share files with other Linux and Windows machines, you must setup a file server.
You can use Samba or NFS for this purpose. But for this tutorial we will only use Samba.
Installing Samba Server
1. Click K->System->Package Manager (Adept)
2. Type the administrator password then click OK
3. Type samba in Quick Filter
4. Select it from the list then install
5. Close the Package Manager
Setup Samba for File Sharing
1. Click K->System Settings
2. Click on Sharing
3. Choose File Sharing
4. You must be in the Administrator Mode to enable file sharing so click on the Administrator Mode button
5. Type in the administrator password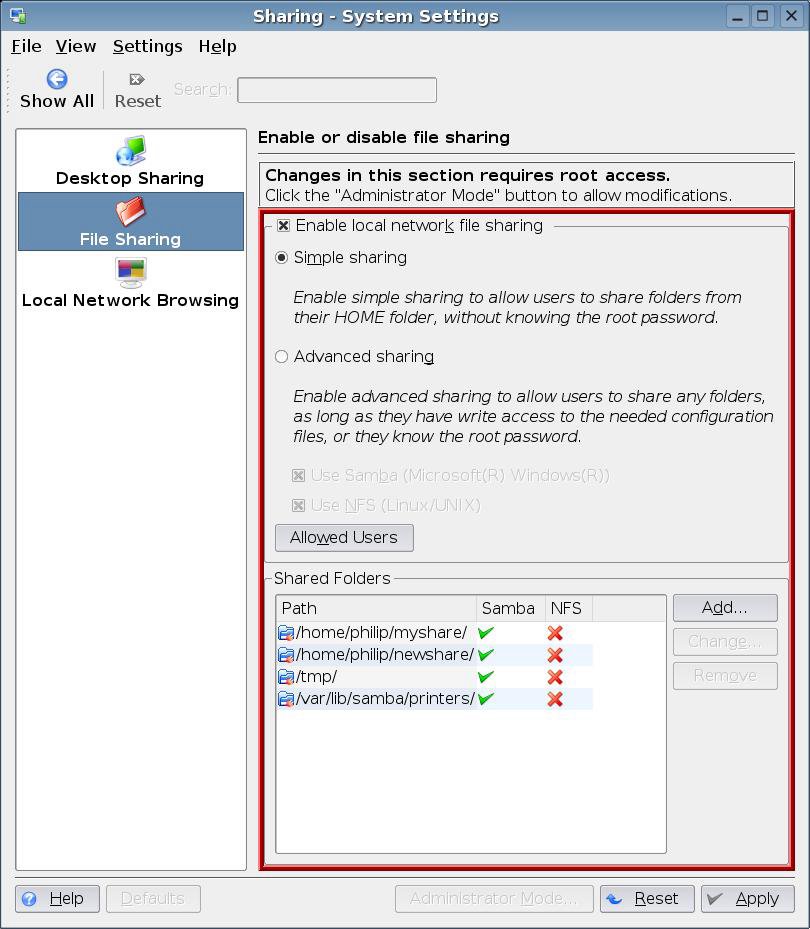
6. Click on Allowed Users
7. Choose Allow all users to share folders then click Ok
Sharing Folders
1. Click on Konqueror on your menubar (it's the third icon)
2. Click Home Folder
3. Right click then choose Create New->Folder
4. Name your folder "MyShare"
5. Right Click on MyShare folder then click on properties
6. Click on the Share tab
7. Click on Configure File Sharing
8. Type the administrator password
9. A new window will be shown.
10. Click on Add
11. Choose the folder that you want to share
12. Click Ok
13. Check "Share with Samba (Microsoft(R) Windows(R))"
14. Check Writable if you want other users to have write access to the folder otherwise you can leave it so that it will be read-only.
15. Click Ok
You have just shared your folder to other Linux and Windows machines.
Accessing Shared Folders
1. Open Konqueror
2. Click Network Folders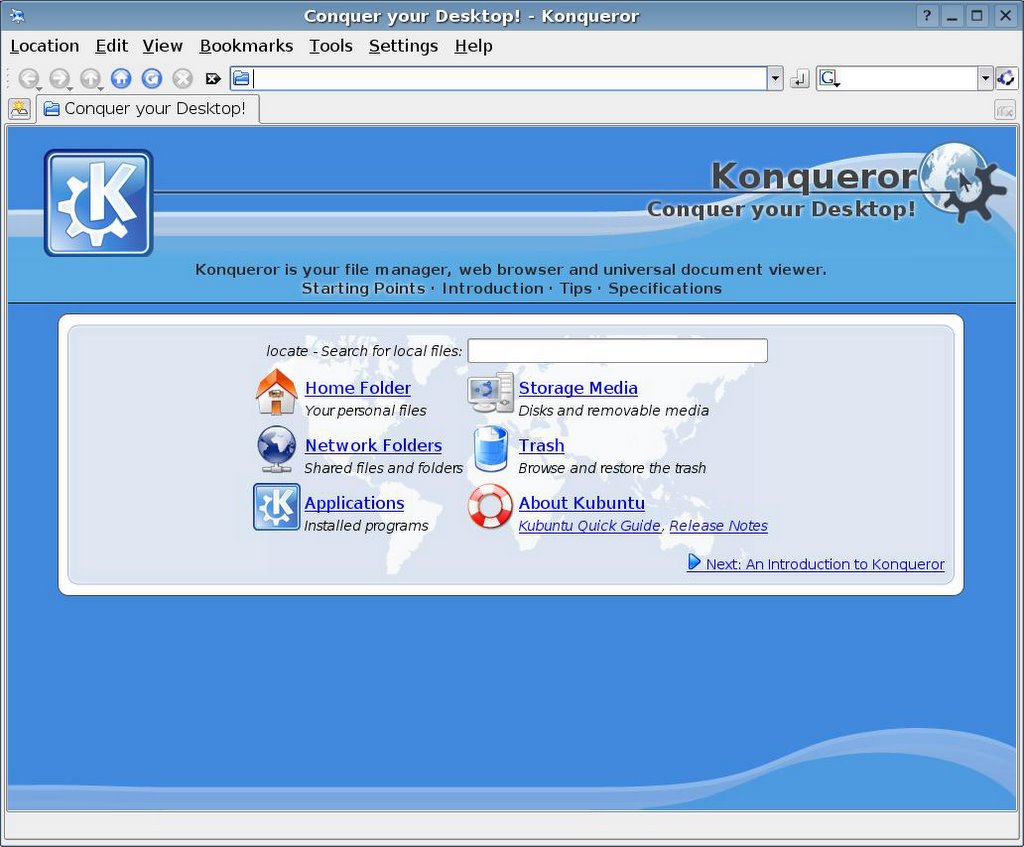
3. Click Samba Shares
4. Choose the workgroup that you want to access. In our case, to be able to access the folder that we have just created you have to click Mshome.
Mshome is the default workgroup that samba created for our Kubuntu machines.
5. Choose the computer name of the Kubuntu machine where you created the shared folder.
Start accessing your shared files.
On my next post I will share to you some insights and the problems I encountered before I was able to make this configuration work.
Saturday, November 12, 2005
HOW TO: Create a Shortcut in Kubuntu
You can customize your menu to have easy access to your frequently used applications. But a quicker way to do this would be to access them through a desktop shortcut.
To create a shortcut:
1. Right-Click on the desktop.
2. Choose "Create New"
3. Select "Link to Application"
This window will be displayed
4. Replace "Link to Application" with the name of the application that you are going to run. Let's replace it with Firefox.
5. Click on the Gear button to choose an icon.
6. Click on the Application tab.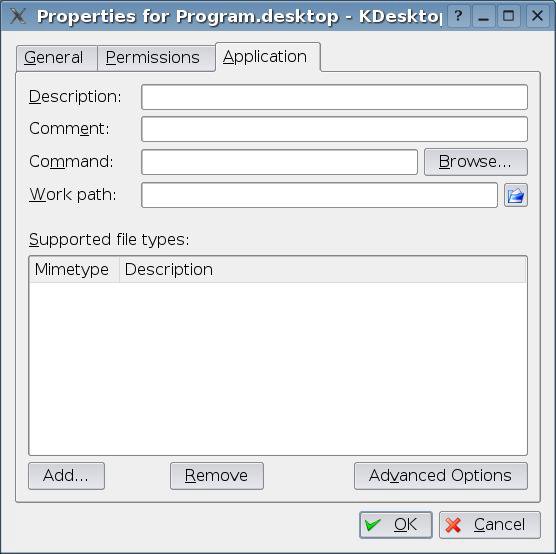
7. Type firefox in the "Command" text box
8. Click Ok
Your desktop screen should appear somewhat like this : Notice my shortcut icon on the upper left corner.
Friday, November 11, 2005
Installing Macromedia Flash Player
If you like watching animated flash movies, then you definitely need to install a flash plugin for your browser.
July 2009 Update:
(Adobe now offers an Ubuntu 9.04+ deb package of the Flash Player. You should get that version instead.)
1. Visit the Macromedia Flash Player download section. Then download the software.
(I am assuming that you are using Firefox and you have already set the download location to your home directory.)
2. Open the Linux Console / Terminal
3. Type
$ tar xzvf install_flash_player_7_linux.tar.gz
(
a. For deb package installers type: sudo dpkg -i install_flash_player_10_linux.deb
This is necessary to check for dependencies.
b. Then type sudo apt-get -f install
to finally install the software
)
This will create a install_flash_player_7_linux directory.
4. Go to this directory by typing:
$ cd install_flash_player_7_linux
5. Type:
$ ls
You will notice a file flashplayer-installer.
6. Type:
$ ./flashplayer-installer
7. Press ENTER to confirm the installation.
The Flash Player requires to files two be installed before it could run properly. These files are gsfonts, gsfonts-x11. Be sure to install them first using adept in Kubuntu and synaptic in Ubuntu.
If you are not familiar on how to go about this, you can refer to my earlier post - Installing Additional Software with Synaptics.
8. After you have installed these two files just continue your installation by pressing ENTER
9. It will display
----------- Install Action Summary -----------
Macromedia Flash Player 7 will be installed in the following directory:
Mozilla installation directory = /home/anthony/.mozilla
Proceed with the installation? (y/n/q):
10 . Just type "y" for yes.
11. Go visit http://www.newgrounds.com
Or you could try some of the fun flash games that I play.
Enjoy!
Thursday, November 10, 2005
Linux: A Programmer's Dream OS
One of the things that attracts me to Linux is the breadth of programming tools/softwares that comes with it.
If I need to program in C, I can use gcc or g++. If I want to program a GUI driven application, I can either program using tcl/tk or I can use gtk with C.
If I am a perl programmer, Linux also comes with it.
If I need a database server, there is postgressql and mysql.
Best of all they are all available for free.
Can you just imagine how many thousands of dollars it would cost if one were to buy each of these softwares?
Another thing is that Linux, along with these programming softwares, come with their source code. If you take the time to study or tinker with them you could really learn a lot.
Tuesday, November 08, 2005
HOW TO: Kubuntu Screen Capture
One of the things I like about Kubuntu Linux is the builtin screen capture program, Ksnapshot.
You can find it in the menu when you click "K" then "Graphics" then "Screen Capture Program".
It is a very handy tool especially for someone doing a tutorial blog like me.
Ksnapshot Options
New Snapshot button - initiates the screen capture
Save As button - allows you to specify the file where you are going to save your screen capture. It also allows you to specify in what graphics format to save whether it be jpeg, png, bmp, etc. (the default is png).
Capture Mode - Allows you to specify what part of your screen to capture.
You can set it to:
a. Fullscreen - to capture the entire screen.
b. Window Under Cursor - to capture the current window that you select
c. Region - to capture a portion or region of the screen.
Snapshot Delay - Allows you to specify when the screen capture will be initiated. You can either tell it to start capturing immediately after you click the left mouse button or say after 3 seconds.
Sample Session
1. Open Ksnapshot
2. Set the Capture Mode to Fullscreen.
3. Click the New Snapshot button. The cursor will change into a crosshair.
4. Click on the screen. You will notice that the preview screen in ksnapshot changed.
5. Click the Save As button.
6. Set the Filter option to JPEG Image then choose an appropriate filename.
You can now use this image in your own tutorials.
Thursday, October 27, 2005
More facts about Using WINE
WINE Directory Structure
When you first run a windows application WINE will create a hidden directory on your home folder.
You can view it by doing an
$ ls -a
You will see that it created a .wine directory
Under .wine directory you have drive_c and dosdevices.
drive_c is of particular interest to us.
In the drive_c directory WINE emulates the Windows directory structure. Under this directory you have:
1. My Documents
2. Program Files
3. Windows
My Documents directory doesn't contain anything.
Program Files directory is where WINE stores your program after you installed them. The .exe files and the .dlls are all stored here.
Windows directory of course contains some system programs that our applications need to run properly.
When an Application won't run
Sometimes I do a winecfg and the windows program I would like to run gets added to the menu. But when I click the program in the menu - nothing happens.
What I do in these cases is go back to the Linux Console and type the command to run the program myself like:
$ wine "C:\\Program Files\\WinZip\\winzip.exe"
(Notice the double \. You need to do this in Linux when specifying the path of a program because \ has a special meaning. That is why you need to do \\ instead)
This method allows me to see what error was generated.
Compatibility Issues
Unfortunately, not every Windows application will run with WINE. There are many versions of Windows and the nuances of each version keeps changing with every patch and updates.
But to save yourself the trouble of looking for which program will run, there is a list at WINEs website.
You can find it at http://appdb.winehq.org/
If your program is not in the list, go ahead and try to run it. It may still work.
If it did not work, there are only two things you can do.
1. You can hack away and make it work.
2. If you are one of the mere mortals like me or you simply don't have the time to tinker with the codes, there is no other choice but to wait.
But as I have said in my previous post, we don't actually need every Windows program to run on Linux because most already have their opensource counterpart.
Personally, what I am really waiting for is stable gaming support to be able to play some of my favorite games like "The Battle for Middle Earth".
"A wizard arrives precisely when he means to. " :)
Tuesday, October 25, 2005
Installing WINE
Normally there will be no reason to install a Windows application on Linux because most Windows application already have a Linux counterpart.
But if you really want to port your favorite Windows software that is not available in Linux yet (in my case, its Flash MX), W.I.N.E is the way to go.
WINE is a Linux software that allows you to run Windows application in Linux.
It's official website is at http://www.winehq.com.
Installing Wine
To install WINE on Kubuntu:
1. Open Adept package manager
2. Type wine on the quick filter text box
3. Select wine from the list
4. Right click
5. Select install package
6. Then click on Commit changes in the toolbar
Testing WINE
To test WINE we first need to download a Windows application
1. Open your browser and go to http://www.winzip.com/downwzeval.htm
2. Download the software.
3. Then open the Linux Console / Terminal
4. Locate the program you have just downloaded
Lets assume it is just in your home directory
5. To install Winzip type:
$ wine winzip90.exe
6. Your program will display something like:
wine: creating configuration directory '/home/anthony/.wine'...
wine: '/home/anthony/.wine' created successfully.
This means that it is creating our emulated Windows directory
7. Install the software as you would normally do in Windows
8. Go back to the Linux Console and Type
$ winecfg
9. Click on the Add Application button
10. Choose Program Files
11. Locate the winzip executable
12. Click open then click Ok.
You have just successfully added the program to your menu
Running the Program:
1. Click on K in the menubar
2. Click wine
3. Click on winzip
Congratulations! You just ran your first Windows program in Linux.
Saturday, October 22, 2005
Uncompressing Files with TAR Command
The tar command can be used for file compression and decompression in Linux. But for this post we will tackle only decompressing files.
Tar command can be used to decompress tar (.tar), gunzip (.gz), and binary zip (.bz2) files.
In order to use this command, in the Linux console/terminal you must type
the command, followed by the options, and the path of the file to decompress.
Example:
$ tar xzvf ktoonbin-0.7.3.tar.gz
where
tar - is the command
xzvf - are the options
ktoonbin-0.7.3.tar.gz - is the file
to extract a .bz2 file we type:
$ tar xjf gyach-enhanced_pyvoice-binary-1.0.7-i586.tar.bz2
Let us examine further the options following the tar command:
Options tell the tar command what it is supposed to do and what input to take.
Each option is comprised of one character that bears a meaning and can be combined with other options.
x - in the first and second example tells the tar command to extract from a compressed file.
z- will tell it to extract from a gunzipped file.
v- simply means to list the files it is currently extracting
f- means to take a file as input
In the second example you will notice the we have "j" instead of "z" for our option.
j option tells tar command to extract from a .bz2 or binary zipped file instead of a gunzipped file.
Once the tar command is finished extracting or decompressing files, you will see its output on the current directory you are in.
Just do an ls command to view the extracted files.
To see what other options are available for the tar command, please type:
$ man tar
Thursday, October 20, 2005
Customizing the Menu
1. Hover your mouse over the K button in the menubar
2. Right Click
3. Choose Menu Editor
4. Choose a category where you are going to place the menu item for your program. In this example, I chose internet.
5. Right click on the category you have chosen.
6. Select New Item.
7. You will be presented with the following screen.
Name - is the name of the program that will appear in the menu
Command - is what you would normally type in the Linux Terminal to run this program.
You can also place a short description and some comment.
You can also assign an icon to the menu item by clicking on the icon button next to Name.
You are also permitted to assign a shortcut key for the program.
8. Close the Menu Editor
9. It will automatically ask you to save your update.
10. Choose Save.
11. Open the Menu and locate your menu item you have just added.
12. You have successfully modified the menu.
Tuesday, October 18, 2005
Chikka SMS for Linux
Today we are going to install an SMS software and at the same time learn about the dpkg command.
dpkg command is the official package manager for Debian based systems like Kubuntu and Ubuntu.
To install a package, you need to issue:
$ dpkg -i packagename
To remove a package, you need to type:
$dpkg -r packagename
I am assuming that you already have gaim installed on your Linux.
If you don't have it, you can open synaptic or adept (for Breezy Badger version).
Just search for the gaim package and install it.
The installer for Chikka for linux can be found at
http://chix.sourceforge.net/downloads.html
You need to download both libchix_1.0.0-1_i386.deb and libchixgaim_1.0.0-1_i386.deb
To install these packages
1. Open a Linux console / terminal
2. Type:
$ dpkg -i libchix_1.0.0-1_i386.deb
3. Type:
$ dpkg -i libchixgaim_1.0.0-1_i386.deb
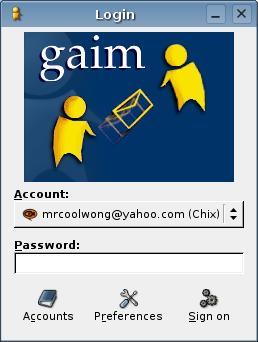
4. Open gaim
5. Add an account then choose Chix as your protocol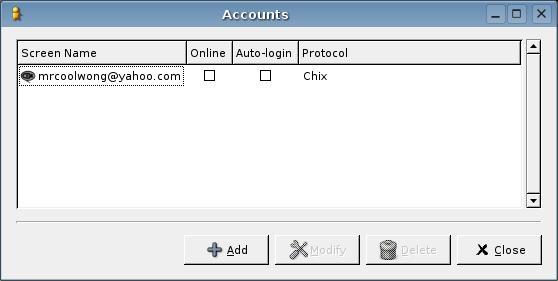
6. Login with your Chikka account
Enjoy!
Monday, October 17, 2005
Why I chose Kubuntu
A lot of you maybe wondering about why I chose Kubuntu over the other Linux distributions.
Originally, I was a Rehat Linux user. But Redhat decided to go commercial so I switched to the next best thing which was Fedora Core, a Linux project also sponsored by Redhat (but is available for free).
In fact, our email server and web server in the office still runs on Fedora Core 1.
Fedora Core is a good choice for servers but if you are going to use it for Desktop PC it is not that user friendly.
You would find in its menu a lot of programs and commands that would be too cryptic for an ordinary Desktop user.
And so I was hoping that future versions of Fedora would solve these issues.
Recent events had put me in a position where I need to find an alternative OS that would be friendly for people used to having Windows.
I have heard about Ubuntu on papers and on an upcoming Linux conference several months ago.
So I checked it out on the web. Downloaded it and installed it.
I was very satisfied with the result.
On earlier versions of Linux distributions it was very important that you know your PC's hardware configuration.
You have to know what brand and model of motherboard you are using. You have to know the exact specification of each and every piece of hardware plugged into your PCI slots. You have to know what graphics card you have, what monitor, and what soundcard. Almost every piece of hardware.
And you have to type this long list during the installation.
But with Ubuntu, I just insert the CD then press ENTER.
It automatically partioned my hard disk. It detected all my hardware without intervention.
I was simply amazed.
But as you all now. I didn't stay with Ubuntu and decided to go for Kubuntu instead.
There are other Linux distributions being suggested by acquintances and friends like Bayanihan Linux which is a locally made distribution.
But I did not go for that simply because too few people are using it and it has not been updated for quite sometime.
This brings me to reason number one.
1. I choose Ubuntu at first because according to DistroWatch.org, it is currently the number one Linux distribution.
For me it means, If I search the web for references, I would find plenty of them as compared to Bayanihan where my major source of references might only be the official website and a couple of users using this distribution.
2. Ubuntu has a very active community infact, they have just released their newest version.
3. I read reviews and they're saying positive things about Ubuntu and Kubuntu
4. The fourth reason is more of a bet.
A lot of Linux distributions come out every month sometimes almost every week. Experience shows us that a lot of these distributions eventually fade into obscurity.
So I am betting on a Linux distribution which in my opinion would endure.
I can see a lot of indicators that Ubuntu / Kubuntu would endure just like Redhat has endured through the years.
And Lastly, Why do I prefer Kubuntu over Ubuntu.
Ubuntu and Kubuntu are the same to the core except for their user interface.
One uses Gnome while the other uses KDE.
I chose Kubuntu over Ubuntu because I found it hard to customize menu in Ubuntu. On the other hand, it was very easy in Kubuntu.
So you see, my reasons were very simple ones.
Sunday, October 16, 2005
Changing Wallpaper in Kubuntu
I have always liked being outdoors. I like loitering around beaches or being high up mountains.
You maybe like me. You may have been dreaming of going out of town but you just can't because there is a job to do or a business to run.
So let's just pretend we are going out of town or better yet out of the country.
1. Click the K button on your menubar.
2. Minimize your browser for a while.
3. Right click on your Desktop
4. Choose configure Desktop
5. Click on Get New Wallpapers
6. Click on Tibet, Mount View
7. Click Install
8. Then close the window
9. On the Configure Desktop window, click on the dropdown list next to Picture
10. Select Tibet, Mount View
11. Click Apply
There you go! You're own mountain view of Tibet.
Happy trekking. :)
Saturday, October 15, 2005
Upgrading to Kubuntu 5.10 (Breezy Badger)
The latest version of Kubuntu, codenamed Breezy Badger is out. There have been several changes since the previous release which was Hoary HedgeHog.
To upgrade your OS from previous version,
1.type:
$ sudo sed -e 's/hoary/breezy/g' -i /etc/apt/sources.list
There are several commands you will notice here.
We need to use the sudo command again because the file we need to edit, which is sources.list, is accessible only to the root user. Take note also that sources.list is stored in /etc/apt directory ,
The sudo command allows us to execute any Linux command as root user.
The sed command stands for 'stream editor'. This program will allow us to modify sources.list.
notice 's/hoary/breezy/g' after -e
s means search
hoary is the word we need to replace
breezy is the word we will replace it with
g means global replacement or replace all occurrence.
-e tells sed to execute a script or expression.
-i tells sed to save the changes in the input file
Our input file is of course /etc/apt/sources.list.
sources.list tells Kubuntu where to download upgrades or additional software packages.
2. then type:
$ sudo apt-get update
3. then:
$sudo apt-get dist-upgrade
A word of warning. This may take you several hours depending on the speed of your internet connection.
If you prefer not to wait this long you can always download the ISO image and burn it on the CD.
Then do a fresh install.
Be sure to backup your files though. And store them somewhere safe before you install.
Thursday, October 13, 2005
Installing Linux YM client with webcam support
Finally we have come to the last part of this series (installing gyachE).
Before you read on, be sure that you have followed the instructions on my two previous posts ( 1 and 2).
If you did, then we are ready.
1. Open the Linux Terminal
2. Login as root by typing
$ sudo -s
then provide the password when asked
3. go to / directory by typing
# cd /
4. list the two gyachE files we have placed there
# ls
5. You should see these two files:
gyach-enhanced_pyvoice-binary-1.0.7-i586.tar.bz2
gyachE-Webcam-Utilities-0.4-i586.tar.bz2
6. Lets install the main program. Type :
# tar xjf gyach-enhanced_pyvoice-binary-1.0.7-i586.tar.bz2
This would automatically put all the files needed by gyachE in their respective directories.
7. Install the webcam plugin. Type:
# tar xjf gyachE-Webcam-Utilities-0.4-i586.tar.bz2
Run gyachE:
# gyach
If you encounter any dependency problems just follow the 10-12-2005 post then try to run gyachE again.
On a later post we will talk about the tar command.
Wednesday, October 12, 2005
Installing Additional Softwares with Synaptics
(July 2009 Update: Since Kubuntu 8.10 - you no longer need to install synaptic. You can find it by clicking on the menu (K button), then Applications tab, and then choose System.)
Kubuntu has a built in package installer and it is called Kynaptic. But it has one disadvantage over its Ubuntu counterpart.
If you want to install packages that are not found with Kubuntu's default repositories, you still need to fire up Synaptics to access additional repositories.
By the way, repositories are simply lists of web sites where Kubuntu and Ubuntu can download additional programs and Linux updates.
It is very similar to Windows Update in Windows XP.
Installing Synaptic
1. Click the K button on the menubar.
2. Click System.
3. Then click Kynaptic (package manager)
4. In Kynaptic, click Edit
5. Click Find
6. On the text box laber "What", type synaptic.
7. Find synaptic in the list
8. Select synaptic
9. Right click then click install if it is not installed yet.
10. Wait for the program to finish then close kynaptic.
Running Synaptic
1. Click the K button on the menubar again.
2. Go back to System
Notice that the Synaptic Package Manager has been installed.
3. Click Synaptic Package Manager
Let us go back to the gyachE website. Go to http://www.phrozensmoke.com/projects/pyvoicechat/install.php#missing
As you can see in the website gyachE requires:
a) Gtk-2 2.0.6 or better
b) GtkHTML-2
We need to install these to for our gyachE YM client to run properly
Installing the Missing Files with Synaptic
1. Go back to synaptic.
2. Click on search
3. On the search box type, libgtk
4. You will notice that synaptic performed a smart search. It displayed all the packages that contained the letters "libgtk".
5. Look for libgtk2.0-0
6. Select it.
7. Right click
8. Select mark for install
9. Then click the Apply button in the synaptic toolbar
10. Click search on synaptic again
11. Type libgtkhtml2-0
12. Search
13. Find and select it from the list
14. Right click
15. Select mark for install
16. Click Apply
On the next post we will finally install gyachE.
Tuesday, October 11, 2005
Copying, Moving, and Renaming Files in Linux
Today we are going to start doing something useful.
We will start learning about installing a Yahoo Messenger client with webcam support.
1. For Kubuntu, start Conqueror web browser. You can find it near the K button on your menubar.
For those using Ubuntu go to your menubar. Then go to internet. Then click on Firefox.
2. Point your browser to
http://www.phrozensmoke.com/projects/pyvoicechat/index.php
This is the official page of GyachE, a program dedicated to Yahoo Messenger
3. Click on their download section
4.
This will bring you to
http://sourceforge.net/project/showfiles.php?group_id=57756
5. Download gyach-enhanced_pyvoice-binary-1.0.7-i586.tar.bz2 , the GyachE program
6. Then download gyachE-Webcam-Utilities-0.4-i586.tar.bz2, the webcam plugin for GyachE
7. Conqueror web browser will ask you where you would like to place the file that you are downloading. Just place it on your default directory. In my case, it is /home/anthony
While Firefox by default will download it on your /home/username/Desktop directory. In my case /home/anthony/Desktop
Let's learn about copying files.
In order for us to install gyachE and it's plugin, we need to move it to the top directory of your Kubuntu or Ubuntu installation which is the / directory.
We won't be able to do this as a normal user because only the root user has access to Linux's top most directory.
So what we will do is
1. Open your Linux terminal.
2. Type
$ sudo -s
3. Type the password so that you can login as root
4. To copy the file to / directory:
Type:
# cp /home/anthony/gyach-enhanced_pyvoice-binary-1.0.7-i586.tar.bz2 /.
5. Then type:
#cp /home/anthony/gyachE-Webcam-Utilities-0.4-i586.tar.bz2 /.
6. If the file is in /home/anthony/Desktop, you would instead do:
#cp /home/anthony/Desktop/gyach-enhanced_pyvoice-binary-1.0.7-i586.tar.bz2 /.
and
# cp /home/anthony/Desktop/gyachE-Webcam-Utilities-0.4-i586.tar.bz2 /.
Now for the explanation of the cp command.
The first argument is the absolute path and the name of your source file.
The second argument is the destination directory or the place where you want to copy your file plus the filename you want to give it.
You will notice the dot after / directory in the destination argument.
It means that I want to retain the original file name when I copy the installer to the new directory.
To verify that you were indeed able to copy the files to / directory.
Type:
#ls /
If you see the files then you were able to copy them.
Let's learn about moving files.
In order to move files in Linux you will need to use the mv command.
The mv command is very similar to the cp command. In fact you could say they are exactly the same.
There is just one big difference. With the mv command the file in the source directory is erased after you moved the file.
so like in the cp command you would type:
# mv /home/anthony/gyach-enhanced_pyvoice-binary-1.0.7-i586.tar.bz2 /.
and
#mv /home/anthony/gyachE-Webcam-Utilities-0.4-i586.tar.bz2 /.
Renaming Files
You could also use the mv command to rename files.
For example:
#mv /home/anthony/gyachE-Webcam-Utilities-0.4-i586.tar.bz2 /home/anthony/gyachEWebcam
What I did was move the file to the same directory but I changed the name to gyachEWebcam
Whew! This has been a long post.
Tomorrow we are going to learn about synaptics to solve gyachE's dependecy issues and then finally on the next post we will install and run GyachE and test the webcam viewer.
If you're adventurous, Just follow the installation instructions on the official home page.
It's pretty easy.
Monday, October 10, 2005
Further Discussion on the cd Command
A few more notes regarding the cd command.
There is an easier way of changing directories.
If you are familiar with the directory hierarchy of your Linux installation, you can type cd plus the absolute path of your destination directory.
For example:
1. Type:
$ cd /usr/bin
2. Then type:
$ pwd
to verify.
If you want to go back to your home directory, in my case it's, /home/anthony,
simply type:
$ cd /home/anthony
Then type:
$ pwd
And you will see that you are back to your original directory.
There is a shorter way of doing this of course.
Simply type:
$ cd
The cd command without any argument always brings you back to your default directory.
On the next post we will learn about moving and renaming files.
Sunday, October 09, 2005
Navigating through Linux Directories
First some insight. This blog is generally about Kubuntu, the KDE counterpart of Ubuntu. But all the post you have read so far can be applied to other Linux distributions except for the following:
1. rpm command is for Redhat and Fedora.
2. dpkg and apt-get commands are for debian based packages like Ubuntu and Kubuntu.
Now on with the lessons.
I've realized that most of you maybe having problem navigating through the Linux folders when using the terminal.
Let me introduce you to the cd command. If you are familiar with the Windows command prompt, you have probably used chdir command to navigate through the Windows directories.
In Linux you will use cd.
1. Open a Linux Terminal (refer to my October 6 post on how to do this).
2. Type:
$ pwd
On my case it will return:
$ /home/anthony
pwd stand for "present working directory". It will tell you where you currently are in Linux.
To navigate to the higher directory:
1. Type :
$ cd ..
The two dots you see after the cd command stands for the parent directory
2. Now type:
$ pwd
On my case, it would display:
$ /home
You will see that my present working directory is now one level higher.
If you want to go higher, just type:
$ cd ..
again
Then check with the pwd command to verify where you are.
Now, assuming you are still at /home directory.
To get to the lower directory:
1. Type:
$ ls
ls command, stands for list. It will list the contents of the directory.
In my case, It displayed:
$ anthony
in Kubuntu you will now that what is listed is a directory because the font color is blue.
To go to the lower directory:
1. Type cd then the name of the lower directory.
$ cd anthony
2. To verify where you are use the pwd command again.
3. If you want to go to a directory lower than /home/anthony, just type cd again and the name of the lower directory.
I hope this was helpful.
Until next time! :)
Saturday, October 08, 2005
Installing from RPMs
RPM is the official installer package for RedHat based distributions.
If you are using Redhat Linux Enterprise, Fedora Core or an earlier version of RedHat Linux, this post will be useful to you.
1. Go to yahoo.messenger.com and download YM for Redhat 9
2. Launch the Linux Terminal (Refer to my October 6, 2005 post).
3. Type:
$ rpm -i rh9.ymessenger-1.0.4-1.i386.rpm
4. To run the program, type:
$ /usr/bin/ymessenger
Remember that I am just using this file as an example.
You should download the file that is appropriate for your Linux version.
If you get an error during installation like lack of access rights or privilege, try to login as root.
In Fedora and Redhat you can do this by typing:
$ su
Then enter the password for the root user.
Friday, October 07, 2005
The Different Install Packages Available in Linux
In Windows you usually look for a .msi, or .exe file to install a new
software.
In Linux you are usually given .bin, .rpm, .deb, .tgz, or .bz2
First lets tackle .bin files because they are the easiest to install.
1. First let us get a .bin file, go to java.sun.com
2. Download the jdk-1_5_0_05-linux-i586.bin ( this file is quite large
47mb so if you could get your hands on any smaller .bin file please
do so. Remember that we are just using this file as an example)
3. Open up a terminal (refer to my earlier post on how to do this)
4. In my case, after the browser finishes downloading, I always find
the file in /home/anthony/Desktop but on some system, downloads are
usually stored on your home directory, say /home/anthony
5. Assuming your file is in /home/anthony, enter the following command
$ chmod 775 jdk-1_5_0_05-linux-i586.bin
this will make the downloaded file exectutable
6. then type
$ ./jdk-1_5_0_05-linux-i586.bin
the program will automatically install
7. to check if the program really did install
simply type
$ ls
if you see a blue jdk1.5.0_05 in your list it means that the software
was installed.
I used 2 commands here that you are not familiar with (chmod and ls)
to see what these commands do type
$ man ls
or
$ man chmod
Good luck.
Thursday, October 06, 2005
Accessing Root Privilege through Linux Terminal
Up to now you have probably updated your Linux installation using
Ubuntu's "synaptics" program.
But if you are going to install a software that is not part of the
standard Ubuntu distribution, there will come a time that you will
need to use root privilege.
To use root privelege.
1. Open the menu
2. Click system
3. Click terminal/console (you can't miss it. it's the one with the
monitor icon)
4. You will be presented with something that is similar to a DOS window
5. type: sudo -s
6. enter the password when asked. (the password is the one you
provided when you first installed Ubuntu)
7. You will know that you are already root when the prompt has change
from the $ sign to a # sign.
8. To go back to a regular user privilege, simply type exit on the # sign.
9. You will notice that the prompt changes back to a $ sign.
Q: So what's the difference between a regular user access and a root
access?
A: With a regular user access I can only read, and write to the
directory or folder assigned to me by Linux. in my case its
/home/anthony
While with a root access I will have a read and write privilege on all
the directories of Linux.
Its important that you keep your root password secure or else any user
will have the ability to mess up your Linux installation.
