Find it
Custom Search

Thursday, August 27, 2009

Kubuntu: Installing Google Earth Free Version

Today we will talk about how to install Google Earth in Kubuntu.

1. Go to http://earth.google.com/download-earth.html

2.Download the Linux version

3. I will assume that you saved the file under the Desktop directory (which is the default place holder for all downloads)

4. Click the K button.

5. Under the Favorites tab, click Terminal

6. Go to the Desktop directory by typing:

cd Desktop/

7. Make sure you find the file GoogleEarthLinux.bin

8. Make the file executable by typing:

chmod +x  GoogleEarthLinux.bin

9. Then execute by:

./GoogleEarthLinux.bin

10. After a while you will see the installer screen


11. Just click on the Begin install button

12. After it finishes it will ask you to run the program.
And here she is


By default Google Earth is installed in /home//google-earth/

So if you want to run again you will have to go inside the directory then type:

./google-earth

But this is kind of tedious so on my next post we will talk about how to add a program in the menu.

Right now you can have an idea of what you can do with this software by visiting my article -> Google Earth Free Version.

See you next time.

Saturday, July 25, 2009

Kubuntu 8.10 and Samba Part 2

First you should check part 1 here: Kubuntu 8.10 and Samba Part 1

There is not really that much left to talk about.

If you setup your samba and choose a folder to share, you just login to your Windows pc and then look at the network neighborhood, you will find your shared Kubuntu folder there.

In your Kubuntu machine though, be sure to check the "Visible check box" in your Samba GUI though or else you won't be able to see your shared folder.

In the Samba GUI, there is also an option to make your shared folders writable or read only.

Check it out. It is easy. You can do it with your eyes closed. :p

Friday, July 24, 2009

Kubuntu 8.10 and Samba Part 1

Samba in Kubuntu 8.10 actually got very much easier to setup compared to the previous version.

1. Click the K button, then Choose Applications tab, then System

2, Click on Adept Package Manager

3. You will need to type your admin password

4. In Adept, click on the Search Icon

5. Type Samba in the text box.

Installing Samba Server

6. Look for the entry for Samba in the list. Then click the check box labeled "Install this Package"

Installing the Samba GUI Interface

7. Look for the entry smbclient. Click the checkbox labeled "Install this Package"

8. Then finally in Adept Manager, Click Adept > Apply Changes

Sharing Folders to Windows

1. Click K button > Applications Tab > Settings > Samba

2. This is your Samba GUI


If you notice there are three buttons. Add Share - which let you add folders that you want to share, Properties - which let you change the settings of your shared folders, and Delete - which lets you unshare your folders.

Some of you may be able to continue from here.

For the others, I will continue this article tomorrow.

Related Link:

Kubuntu 8.10 and Samba Part 2

Sunday, July 19, 2009

Installing Mozilla Firefox 3 in Kubuntu

First thing you need to do is check that you are able to download from Third Party Repositories.

(Take note that I am using Kubuntu 8.10 for reasons I stated in Me and the Computer)

1. Click the K button

2. Choose the Applications tab

3. Click System

4. You will find three Package Manager choices here. You will see an Add/Remove Programs, Adept, and Synaptic package managers.

For this lesson we will choose Adept.

5. In Adept click on the Sources button. It is the one with the picture of Earth.

6. Then click on Edit Sources

7. You will be presented with the Software Sources window.

8. Click on Third-Party Software tab.

9. Check all the sources listed then click the Close button.

Installing Mozilla Firefox 3

1. Back in Adept main window, click on Search.

2. Type Mozilla Firefox in the text box.

3. You will see an entry for Firefox 3.0

4. Click this then click the check box that say install this software

5. Then click Adept in the menu.

6. Choose Apply Changes

After the program finishes installing, you should now find it at:

K button > Applications tab > Internet

Hover your mouse over the Mozilla Firefox Icon then right click.

Choose Add to Favorites, so that you could easily find it next time.

(The installer for Firefox 3.5.1 is also available for Linux. But we will have to do it manually. Unfortunately, I'm too lazy to do that at the moment. Hehe.
Maybe in a future lesson.)

Saturday, May 23, 2009

How to Install Adobe AIR Applications in Kubuntu

1. Click on the K button at the bottom left of your screen

2. Choose Application tab

3. Go to Utilities

4. Click on Adobe AIR Application Installer

5. Choose the Adobe AIR installer you have downloaded. Adobe AIR installers always end with a
.air extension

6. Then do steps 1 - 3.

7. You can find your new Adobe AIR application in the Utilities menu.

Friday, May 15, 2009

Installing Adobe AIR in Kubuntu

1. First open your browser and go to http://get.adobe.com/air/

2. Download the software

3. By default all your downloads will go to /home/username/Desktop. so you need to open the terminal and go there.

4. Make sure that the file is there by typing:

ls

5. You should see a file named AdobeAIRInstaller.bin

4. Type:

sudo chmod +x AdobeAIRInstaller.bin

What this mean is that you are making the installer executable.

5. Type:

sudo ./AdobeAIRInstaller.bin

6. After the installation is finished close the terminal.

7. Click on the K button at the bottom of your screen

8. Choose the Applications tab

9. Then click on Utilities

10. You should find an entry for Adobe AIR Application Installer. This is what you will use when you are installing an Adobe AIR application program like Klok.

Friday, May 08, 2009

How to Enable Alt Left Click in Kubuntu 8.10

There are graphics programs that need to use Alt+ Left Click. For example, Blender uses it to allow the user to rotate the 3D Model.

You can't do by default inside Kubuntu but we can change that.

Here are the steps you need to enable Alt+ Left Click

1. Click the K button at the bottom left of your Kubuntu 8.10 panel.

2. Choose System Settings

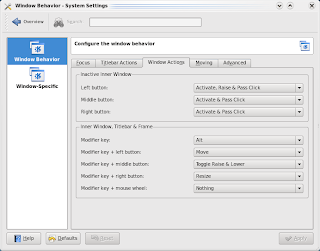
3. You will be presented with this screen

Kubuntu 8.10 System Setting Window

4. Choose the Windows Behavior icon

5. You will then be presented with this screen

Kubuntu Window Behavior

By default the tabs will be set to focus.

6. Choose Window Actions tab

7. Look for Modifier Key under Inner Window, Titlebar and Frame section

8. Change the Modifier Key setting to Meta

9. Click the Apply button then test your graphics program.


You should now be able to do Alt+Click commands.

Tuesday, April 07, 2009

Privacy Policy

We use third-party advertising companies to serve ads when you visit our website. These companies may use information (not including your name, address, email address, or telephone number) about your visits to this and other websites in order to provide advertisements about goods and services of interest to you. If you would like more information about this practice and to know your choices about not having this information used by these companies, click here.

Wednesday, September 05, 2007

Installing Mozilla Firefox 2.0.0.6 on Kubuntu 7.04


Konqueror, Kubuntu's default web browser is great but Mozilla Firefox is one of the two most popular browsers out there.

But you have probably discovered that you can't just install it on a freshly created Kubuntu desktop.

For me doing a full system upgrade before installing Mozilla Firefox solved this problem.

To do this:


1. Open the Adept Manager by clicking K>System>Adept Manager
2. Type in the administrator password
3. Choose Full Upgrade in the Adept Manager

After Kubuntu has finished upgrading you can then proceed to install Firefox.

Note: if you are an advanced user, you could instead manually select which part of Kubuntu to upgrade with regards to installing Firefox without errors rather than upgrading everything.

Update: Installing Mozilla Firefox 3.0 in Kubuntu

Saturday, August 18, 2007

Regarding Chikka and Gaim

Some readers have reported Chikka no longer works for the latest Kubuntu version. I checked GAIM and I found out that GAIM is no more.

If you check the sourceforge repository you will see that there aren't any GAIM file there. Instead you would find a link that points to http://pidgin.im.

Anyway, for my fellow Linux users, you can still use Chikka with any Linux distribution. That is, we will have to use Chikka Java Lite version.

Thursday, August 09, 2007

Kubuntu Feisty Fawn and the Built in Sound Support

One of the things I like about the latest Kubuntu is the sound support. After I have installed the operating system the sound device works automatically.

Unlike in Windows XP, everytime I make a fresh install of Windows XP I also had to reinstall the sound driver.

But of course, this feature would depend if your sound device is already supported by Kubuntu Feisty Fawn natively.

If it is not you would still be required to do a manual install.

Monday, October 30, 2006

Sharing Samba Folders to Windows XP Client

I have actually updated this tutorial already for a newer version of Kubuntu. You can read it here: Kubuntu 8.10 and Samba.

But guess what, nobody with a Samba problem who landed here is taking the time to look. :)

You should. The process is much easier now.

And you can consider the rest of this tutorial - Obsolete.

This is a quick and dirty way to share samba folders to Windows XP.

1. Modify smb.conf in your Kubuntu Linux accordingly. (You can find smb.conf in the etc directory)

/* smb.conf */

[global]
logon drive = p: // Here you can set the drive letter
encrypt passwords = yes

/* To allow only specific hosts who can connect to server below entry is used make sure localhost is added */

hosts allow = IP-address, 127.0.0.1/255.255.255.0

logon home = \\netbiosname\%U // home directories will be mounted as the user logs on.

passwd program = /usr/bin/passwd %u

wins support = yes //Enable the windows support
dns proxy = no

netbios name = wealhtheow //Set the netbiosname

netbios aliases = rch01 //Set the alias, this is optional

unix password sync = No //Sync the unix passwords

logon path = \\rch01\profiles\%U // This will tell the server where to place the home directories

workgroup = rch.uky.edu // Workgroup to be used, all clients should have the same workgroup

os level = 64 // set the OS level

// Below entries are important in order to tell that Samba server is the domain controller
domain logons = yes
pam password change = yes
preferred master = yes
domain master = yes
local master = yes

[homes]
comment = Home Directories
browseable = no
writable = yes
valid users = %S
read only = no
create mode = 0600
directory mode = 0700

logon home = \\rch01\%U // This tells where is the home directory for the user

hide files = /*.pst/

[profiles]
create mode = 0600
directory mode = 0700
path = /home/samba/profiles/
profile acls = yes
read only = no
writable = yes

2. Then follow the instructions in this link http://www.faqs.org/docs/samba/ch03.html
This link is a very lengthy chapter. But some points to remember are:
Your Windows XP user account must have an equivalent user account in Linux.
Example:

mrcoolwong - windows xp user account
mrcoolwong - linux user account

To be able to access the linux samba shared folders, you must login in Windows XP using mrcoolwong.


References:

https://www.ccs.uky.edu/docs/samba.htm
http://www.faqs.org/docs/samba/toc.html
http://www.faqs.org/docs/samba/ch03.html

Sunday, August 20, 2006

Some Comments on Daper Drake Installation

As I have mentioned in my previous post, unlike in the previous version of Kubuntu, there is no separate Install CD and Live CD to download. The Live CD is also the installer.

To install Kubuntu Daper Drake
1. Locate the Install icon in the desktop.
2. Click it and the Live CD would begin the installation process.
3. Just fill up the all the prompts and you should be done.

Some comments about the installation process
I have installed Kubuntu on an MSI motherboard and the installation ran smoothly. But today when I installed Kubuntu on an ECS motherboard I encountered some quirks.

First quirk. I could not proceed installing the software on a non empty hard disk. I was hoping to run the software and delete the current partition during the process. But instead I have to put the hard disk as slave to a Windows PC and delete the partition from there.

After that the installation ran smoothly.

Second problem. The network connection did not start immediately. I rebooted my pc and used the Live CD again to see if the connection works there. I rebooted from the hard disk again. I had to reboot twice before the network connection would finally work.

On my other PC , which was newer than this one, I did not have to do anything. Setup worked immediately. But with this one I have to do several test before it worked.

It is common for Linux derivatives to encounter these kinds of quirks on some hardware. The reason for this being, the hardware you might be using might not been fully tested yet by the developers.

Friday, July 28, 2006

Kubuntu Blogger Returns

It's been ages since i last updated this blog. My girlfriend's hard disk got accidentally formatted and I have to lend her my hard disk until we can recover the data.

Anyway, Daper Drake has been released last June. There's a lot of new features for us to explore. Like, the Live CD is now also the installer CD. I remember that I used to download separate ISO images for the Live CD and Installer CD.

There is also request for a tutorial on how to install Warcraft in Kubuntu. I will do my best to find time to write about that and I will also proceed exploring the features of Kubuntu Daper Drake.

Lastly, It's nice to be back.

Saturday, November 26, 2005

Linux Gaming Part 4 - Installing NVidia Graphics Driver

Kubuntu provides a package that allows you to take advantage of the capability of your NVidia Graphics Card.

Installing the NVidia Graphics Driver

1. Open Adept by going to K->System->Package Manager (Adept)

2. Type nvidia on the Quick Filter text box.

3. Choose nvidia-glx from the list.

4. Click the install package button.

5. Click commit changes button. You can find it on the menubar of Adept.


After installation you still have to enable the graphics driver.

Enabling the Nvidia GLX driver

1. Go to the Linux console by clicking K->System->Terminal Program (Konsole)

2. Type:

$ sudo nvidia-glx-config enable

3. Provide the administrator password

You will know that your installation is successful if you see the NVidia splash screen everytime X windows starts.

Friday, November 25, 2005

Linux Gaming Part 3 - Installing Cedega

The installation procedure of Cedega is very similar to WINE.

You can always compile from source but the quickest way to install Cedega is to get the latest stable package at http://transgaming.com.

You first need to subscribe in order to have access to this package.

One you have downloaded the package you simply:

1. Open the Linux Console

2. Type:
$ sudo dpkg -i cedega_5.0.1_i386.deb

3. Type:
$ cedega
This will display the license agreement screen.

4. Simply click the accept button

5. Enter your subscription user and password

6. Just follow the rest of the setup wizard's instructions

Cedega would download Microsoft Fonts, MozControl Package, then finally the Cedega Engine.

To confirm that Cedega has really been installed click K->Games->Transgaming Cedega.

It's there.

Tuesday, November 22, 2005

Linux Gaming Part 2

WINE Versus Cedega

WINE and Cedega can both be used to run Windows compiled games in Linux.

WINE though covers a wider scope. It is intended to run not just games but every Windows application.

The philosophy behind this, of course, is that if people can run every Windows application in Linux then they would have an easier time shifting to Linux.

Cedega on the otherhand is solely intended to run Windows games.

WINE pros
1. free
2. can run older Windows games

WINE cons
1. It's wider focus leads to slow development with regards to gaming.


Cedega Pros
1. Can run several of the latest Windows Games
2. Faster gaming development

Cedega Cons
1. Requires $5 subscription per month ( $15 initial subscription)

In the long run Cedega becomes costly. A one year subscription would amount to $60. And you are just paying for the ability to run a Windows game. You haven't even bought a game yet.

Saturday, November 19, 2005

Linux Gaming Part 1

I promised that on my next post I would discuss about accessing shared folders from Windows to Linux. Unfortunately, I would have to satisfy that promise on some future post.

In the meantime, Let me begin a series on another important topic that concerns Linux. That is the efforts to make Linux a serious gaming platform.

There are two kinds of movement to make Linux a serious gaming platform.

The first push is to develop games that are native to Linux. an example of this is Planeshift3D although it also runs on Windows and Mac OSx.

The other effort is to make Windows native games run on Linux through software translation. Examples of these efforts are Wine and Cedega.

Lets discuss about the first kind of effort. Linux gamers would always be left out by Game Publishers. There would always be a huge discrepancy between games published for Windows and those that are also published for Linux.

Linux thrives as a server OS but at the moment there are simply too few customers using Linux as desktop that the game publishers are not investing effort to make their titles available for Linux.

These may change in the future when more people have Linux for their desktop.

Perhaps the current trend of moving productivity softwares to web based will also help change this fact.

When most applications become web based it would not matter anymore to people whether they are using Linux or Windows for their everyday tasks.

This would help accelerate their shift to Linux since Linux is freely downloadable and comes with no license cost.

When this day comes game publishers would have to anticipate where their users would be coming from. And they would have to support all platforms.

But it remains to be seen.

Perhaps three years more before we see this happening.

Wednesday, November 16, 2005

Some Comments on Samba

Update July 2009: Kubuntu 8.10 and Samba

First Note. Samba is intended to be installed on one machine that will act as a file server. A file server of course is a computer whose sole purpose is to keep files that people want or need to share.

Kubuntu comes with a built-in Samba client that enables it to read and write to shared folders.

But on many cases today where Linux is being pushed as a Desktop OS (Operating System) this scenario would not work. Because people would want to share files on their own computer without going to a dedicated file server.

In this case, you have to install the whole Samba package (client and server) on the machine.

Second Note, only the administrator can set the folder sharing feature. If you're the only one using the workstation and you have administrator privilege, this would not be a problem. But if another user is using the workstation and they don't have administrator privilege, this would be difficult and time consuming for the administrator. Because they would have to call the administrator everytime they want to make changes to their folder settings.

A good way to tackle this would be for the administrator to predesignate a folder where users could drop files they want to share.

So far we have just tackled sharing files from Linux to Windows and Linux to Linux.

On the next post we will talk about sharing files from Windows to Linux.

Monday, November 14, 2005

How To: Share Files Using Samba

Please refer to this update: Kubuntu 8.10 and Samba for the newer and improved way of handling this.

In order for Kubuntu to share files with other Linux and Windows machines, you must setup a file server.

You can use Samba or NFS for this purpose. But for this tutorial we will only use Samba.


Installing Samba Server

1. Click K->System->Package Manager (Adept)

2. Type the administrator password then click OK

3. Type samba in Quick Filter

4. Select it from the list then install

5. Close the Package Manager


Setup Samba for File Sharing

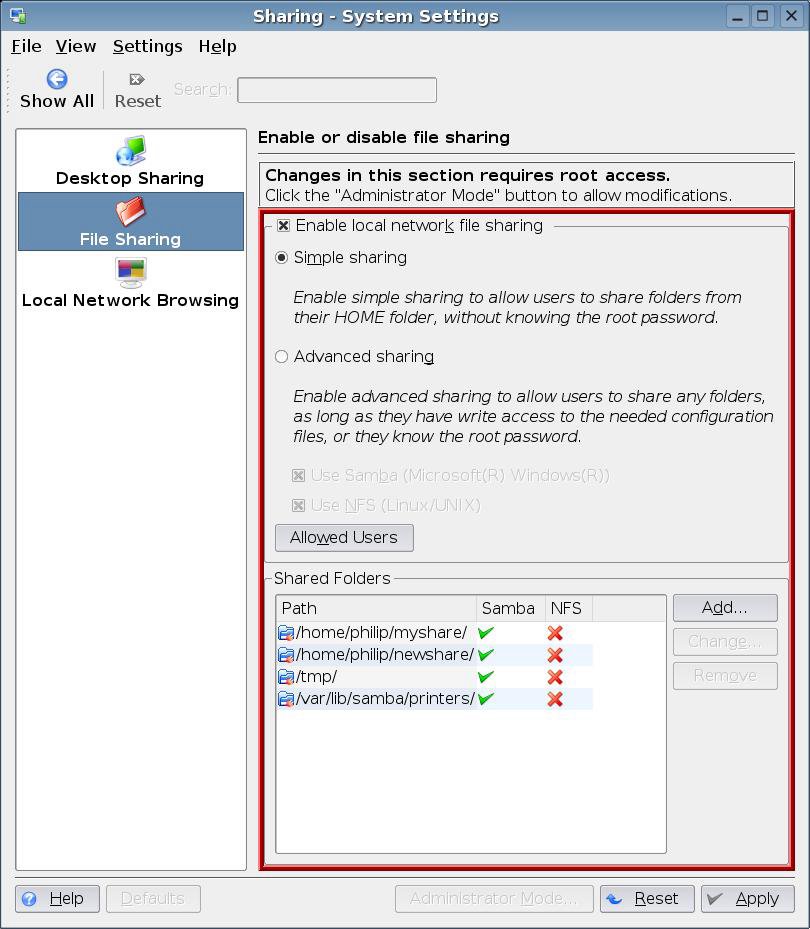
1. Click K->System Settings


2. Click on Sharing

3. Choose File Sharing

4. You must be in the Administrator Mode to enable file sharing so click on the Administrator Mode button

5. Type in the administrator password


6. Click on Allowed Users

7. Choose Allow all users to share folders then click Ok


Sharing Folders

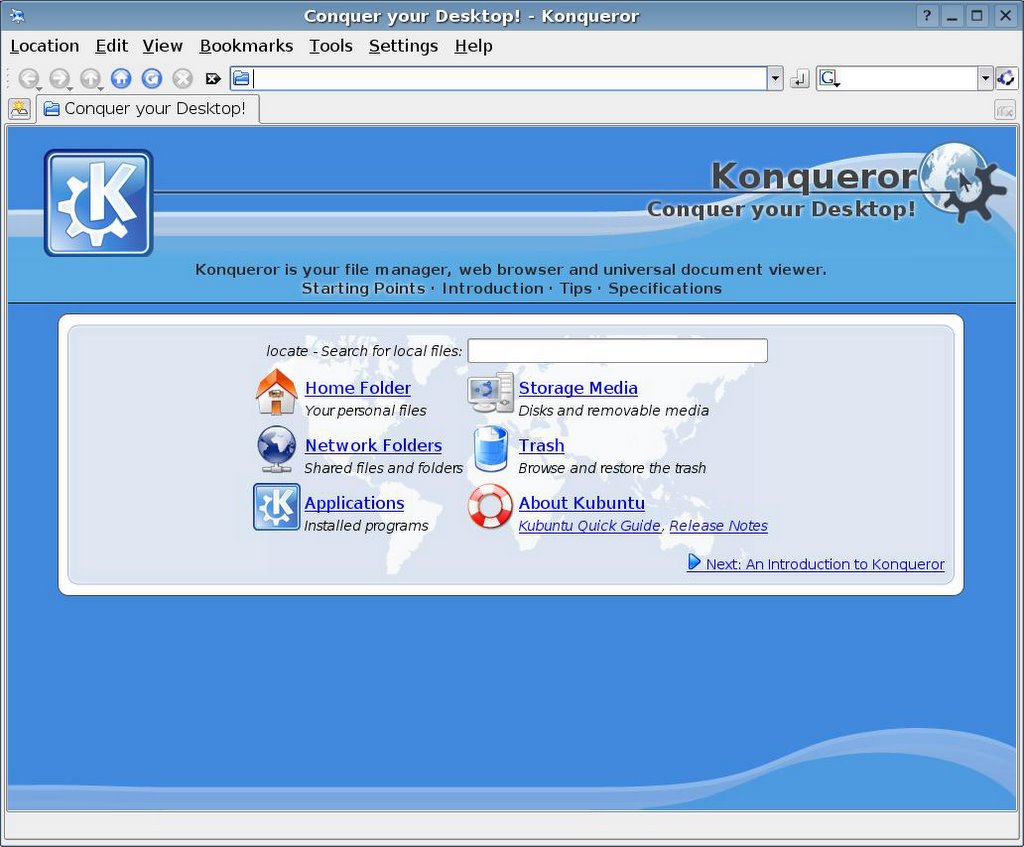
1. Click on Konqueror on your menubar (it's the third icon)

2. Click Home Folder

3. Right click then choose Create New->Folder

4. Name your folder "MyShare"

5. Right Click on MyShare folder then click on properties

6. Click on the Share tab

7. Click on Configure File Sharing

8. Type the administrator password

9. A new window will be shown.

10. Click on Add

11. Choose the folder that you want to share

12. Click Ok

13. Check "Share with Samba (Microsoft(R) Windows(R))"

14. Check Writable if you want other users to have write access to the folder otherwise you can leave it so that it will be read-only.

15. Click Ok

You have just shared your folder to other Linux and Windows machines.


Accessing Shared Folders

1. Open Konqueror

2. Click Network Folders


3. Click Samba Shares

4. Choose the workgroup that you want to access. In our case, to be able to access the folder that we have just created you have to click Mshome.

Mshome is the default workgroup that samba created for our Kubuntu machines.

5. Choose the computer name of the Kubuntu machine where you created the shared folder.

Start accessing your shared files.

On my next post I will share to you some insights and the problems I encountered before I was able to make this configuration work.