Find it
Custom Search

Thursday, August 27, 2009

Kubuntu: Installing Google Earth Free Version

Today we will talk about how to install Google Earth in Kubuntu.

1. Go to http://earth.google.com/download-earth.html

2.Download the Linux version

3. I will assume that you saved the file under the Desktop directory (which is the default place holder for all downloads)

4. Click the K button.

5. Under the Favorites tab, click Terminal

6. Go to the Desktop directory by typing:

cd Desktop/

7. Make sure you find the file GoogleEarthLinux.bin

8. Make the file executable by typing:

chmod +x  GoogleEarthLinux.bin

9. Then execute by:

./GoogleEarthLinux.bin

10. After a while you will see the installer screen


11. Just click on the Begin install button

12. After it finishes it will ask you to run the program.
And here she is


By default Google Earth is installed in /home//google-earth/

So if you want to run again you will have to go inside the directory then type:

./google-earth

But this is kind of tedious so on my next post we will talk about how to add a program in the menu.

Right now you can have an idea of what you can do with this software by visiting my article -> Google Earth Free Version.

See you next time.

Saturday, July 25, 2009

Kubuntu 8.10 and Samba Part 2

First you should check part 1 here: Kubuntu 8.10 and Samba Part 1

There is not really that much left to talk about.

If you setup your samba and choose a folder to share, you just login to your Windows pc and then look at the network neighborhood, you will find your shared Kubuntu folder there.

In your Kubuntu machine though, be sure to check the "Visible check box" in your Samba GUI though or else you won't be able to see your shared folder.

In the Samba GUI, there is also an option to make your shared folders writable or read only.

Check it out. It is easy. You can do it with your eyes closed. :p

Friday, July 24, 2009

Kubuntu 8.10 and Samba Part 1

Samba in Kubuntu 8.10 actually got very much easier to setup compared to the previous version.

1. Click the K button, then Choose Applications tab, then System

2, Click on Adept Package Manager

3. You will need to type your admin password

4. In Adept, click on the Search Icon

5. Type Samba in the text box.

Installing Samba Server

6. Look for the entry for Samba in the list. Then click the check box labeled "Install this Package"

Installing the Samba GUI Interface

7. Look for the entry smbclient. Click the checkbox labeled "Install this Package"

8. Then finally in Adept Manager, Click Adept > Apply Changes

Sharing Folders to Windows

1. Click K button > Applications Tab > Settings > Samba

2. This is your Samba GUI


If you notice there are three buttons. Add Share - which let you add folders that you want to share, Properties - which let you change the settings of your shared folders, and Delete - which lets you unshare your folders.

Some of you may be able to continue from here.

For the others, I will continue this article tomorrow.

Related Link:

Kubuntu 8.10 and Samba Part 2

Sunday, July 19, 2009

Installing Mozilla Firefox 3 in Kubuntu

First thing you need to do is check that you are able to download from Third Party Repositories.

(Take note that I am using Kubuntu 8.10 for reasons I stated in Me and the Computer)

1. Click the K button

2. Choose the Applications tab

3. Click System

4. You will find three Package Manager choices here. You will see an Add/Remove Programs, Adept, and Synaptic package managers.

For this lesson we will choose Adept.

5. In Adept click on the Sources button. It is the one with the picture of Earth.

6. Then click on Edit Sources

7. You will be presented with the Software Sources window.

8. Click on Third-Party Software tab.

9. Check all the sources listed then click the Close button.

Installing Mozilla Firefox 3

1. Back in Adept main window, click on Search.

2. Type Mozilla Firefox in the text box.

3. You will see an entry for Firefox 3.0

4. Click this then click the check box that say install this software

5. Then click Adept in the menu.

6. Choose Apply Changes

After the program finishes installing, you should now find it at:

K button > Applications tab > Internet

Hover your mouse over the Mozilla Firefox Icon then right click.

Choose Add to Favorites, so that you could easily find it next time.

(The installer for Firefox 3.5.1 is also available for Linux. But we will have to do it manually. Unfortunately, I'm too lazy to do that at the moment. Hehe.
Maybe in a future lesson.)

Saturday, May 23, 2009

How to Install Adobe AIR Applications in Kubuntu

1. Click on the K button at the bottom left of your screen

2. Choose Application tab

3. Go to Utilities

4. Click on Adobe AIR Application Installer

5. Choose the Adobe AIR installer you have downloaded. Adobe AIR installers always end with a
.air extension

6. Then do steps 1 - 3.

7. You can find your new Adobe AIR application in the Utilities menu.

Friday, May 15, 2009

Installing Adobe AIR in Kubuntu

1. First open your browser and go to http://get.adobe.com/air/

2. Download the software

3. By default all your downloads will go to /home/username/Desktop. so you need to open the terminal and go there.

4. Make sure that the file is there by typing:

ls

5. You should see a file named AdobeAIRInstaller.bin

4. Type:

sudo chmod +x AdobeAIRInstaller.bin

What this mean is that you are making the installer executable.

5. Type:

sudo ./AdobeAIRInstaller.bin

6. After the installation is finished close the terminal.

7. Click on the K button at the bottom of your screen

8. Choose the Applications tab

9. Then click on Utilities

10. You should find an entry for Adobe AIR Application Installer. This is what you will use when you are installing an Adobe AIR application program like Klok.

Friday, May 08, 2009

How to Enable Alt Left Click in Kubuntu 8.10

There are graphics programs that need to use Alt+ Left Click. For example, Blender uses it to allow the user to rotate the 3D Model.

You can't do by default inside Kubuntu but we can change that.

Here are the steps you need to enable Alt+ Left Click

1. Click the K button at the bottom left of your Kubuntu 8.10 panel.

2. Choose System Settings

3. You will be presented with this screen

Kubuntu 8.10 System Setting Window

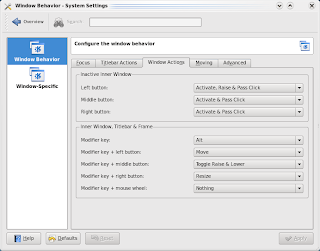
4. Choose the Windows Behavior icon

5. You will then be presented with this screen

Kubuntu Window Behavior

By default the tabs will be set to focus.

6. Choose Window Actions tab

7. Look for Modifier Key under Inner Window, Titlebar and Frame section

8. Change the Modifier Key setting to Meta

9. Click the Apply button then test your graphics program.


You should now be able to do Alt+Click commands.

Tuesday, April 07, 2009

Privacy Policy

We use third-party advertising companies to serve ads when you visit our website. These companies may use information (not including your name, address, email address, or telephone number) about your visits to this and other websites in order to provide advertisements about goods and services of interest to you. If you would like more information about this practice and to know your choices about not having this information used by these companies, click here.